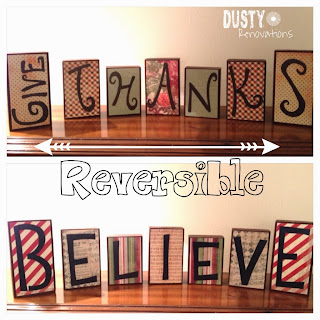
Reversible holiday blocks!
Here is one of my newest projects, and i'm so excited about it! I've been wanting to make some reversible holiday blocks for a long time now and I didn't think I could do it without a cricket, but I figured out a way to do it! So for those of you out there that don't have a cricket.... it is possible! You can do it! And here is how...
Things you'll need:
1) A 2x4
2) Acrylic paint (color of your choosing)
3) Paint brushes
4) Scrapbook paper (4 pieces of paper per side + 2 pieces of solid scrapbook paper for each side)
5) Mod podge
6) Letter stencils--style(s) of your choosing (I got my two different styles at Hobby Lobby... of course!)
First you will take your 2x4 and cut it up to the lengths you want the blocks. Then sand each block down, so all surfaces are fairly smooth.
After that, you will paint the blocks the color of your choosing! Paint all sides and top and bottom. I painted two coats on mine, because the first one didn't look like it was enough.
While those are drying, you can cut the scrapbook paper to the sizes needed. Then once the blocks are dry, mod podge the scrapbook pieces onto them. I did the "Give Thanks" side first, and once it was dry I mod podged the other side.
Now, the sort of tricky part. The letters. Like I said earlier, I don't have a cricket or anything like it to cut out vinyl letters. So I got two different styles of stencil letters to use. The stencil size fit the smaller block perfectly, but that means the letters were a little small for the bigger blocks. So I just elongated the letters when I was tracing them on the paper. I would measure how big I needed/wanted the letters to be and would trace the top, then move it down and trace the bottom, then I sort of free-balled the middle. Haha! But hey, it worked! And it was actually pretty easy to do! :)
So once you have all of your letters traced and cut out, you are ready to mod podge them on! After all the letters were securely on, I mod podged the whole block to give it extra security and to make sure it all had the same finish.
And now you have ONE decoration for TWO different holidays!
(And yes those are my spooky pumpkins.. I just turned them around so the spiders are on the back side! Another decoration for multiple holidays!)
Hope you enjoy!! :)


Comments
Post a Comment